Why Many 4×4 Owners Start with the Rear Axle?
Before Ordering a Locker, Identify the Axle
- Vehicle model and production year
- Front or rear installation
- Axle model or housing code
- Axle shaft spline count
- Original gear ratio
- Ring gear diameter
- Ring gear bolt pattern
- Differential bearing dimensions
- Photos of the original differential and axle housing
Measure the Original Setup Before Taking It Apart
Removing the Original Differential
The exact removal process depends on the axle design, but the general sequence is similar.
First, make sure the vehicle is safely supported. A differential assembly is heavier and more awkward than it looks, especially when working underneath a vehicle.
Remove the filler plug before draining the oil. It is better to discover a seized filler plug while the axle still contains oil than after it has already been emptied.
The propeller shaft is then disconnected and secured away from brake pipes, suspension components and wiring. Depending on the axle design, the hubs or axle shafts must be moved outward so that their splines disengage from the differential.
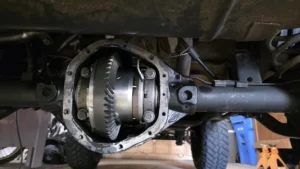
Some axles use a removable third member. Others require the rear cover to be removed before the carrier can be taken out of the housing.
Whichever design you are working with, do not let the differential drop unexpectedly. Use a transmission jack, lifting platform or a second person if necessary.
This is not the part of the job where anyone wins points for working alone.Transferring the Ring Gear to the Locker
Once the carrier is on the workbench, the ring gear can be removed from the original differential.
The mounting surface must be completely clean. Dirt, rust or a small metal burr trapped between the ring gear and the new carrier can cause runout, incorrect backlash and gear noise.
Some ring gears use a slight interference fit. If controlled heating is permitted, warming the ring gear evenly can help it fit onto the new carrier. An open flame should never be used, and force should not be applied directly to the gear teeth.
The ring gear bolts should be tightened progressively in a cross pattern. Use the thread-locking compound and torque value specified for that particular axle.
There is no universal torque figure that applies to every differential. A value taken from another Land Rover, Toyota or Jeep axle may be completely wrong for the unit on the workbench.
We also recommend fitting new, good-quality carrier bearings. Bearings should be installed with a press and the correct adapters. Hitting them into position may save a few minutes, but it can damage the bearing before the vehicle has even left the workshop.The Most Important Part: Backlash, Preload and Contact Pattern
Installing the locker into the housing is only part of the job. Setting up the final drive correctly is what determines whether it will run quietly and reliably.
Backlash must be measured with a dial indicator. It should not be judged only by moving the ring gear by hand.
The technician must also check the differential bearing preload and ring gear runout. Once these measurements are within the axle manufacturer’s specification, gear marking compound should be applied to several teeth.
Rotating the gears under resistance reveals the contact pattern between the ring gear and pinion.
This pattern tells an experienced technician whether the gears are correctly positioned. If the contact is too close to the heel, toe, face or root of the tooth, further adjustment may be necessary.
This step should not be skipped simply because the gears were quiet before the carrier was replaced. A different carrier and new bearings can change the final position of the ring gear.
If the differential begins whining after installation, that should not be dismissed as normal “running in.” The backlash, bearing preload and contact pattern should be checked again.Installing the Electrical System
The electrical side of an E-Locker looks simple, but poor wiring can make a mechanically sound locker unreliable.
The wiring harness should be routed away from the exhaust, propeller shaft, suspension movement and sharp edges. It must have enough flexibility for axle movement without hanging loose underneath the vehicle.
Any electrical pass-through in the differential housing must be properly sealed. The connection needs to keep oil inside the axle while preventing water and dirt from entering.
Use the supplied harness and a correctly fused power source. Earth connections should be made to clean metal and protected against corrosion.
We do not recommend connecting the locker to the first wire that happens to show voltage. The power supply, earth and switch circuit should be checked with a multimeter.
After wiring, test the locker several times before finishing the interior trim. It is much easier to correct a connection while everything is still accessible.Reassembly and Initial Testing
Before reinstalling the differential, clean the axle housing carefully. If a hole has been drilled for the wiring, make sure no metal particles remain inside.
Clean the sealing surfaces and apply the correct gasket or sealant. Reinstall the differential, axle shafts, hubs, brakes and propeller shaft according to the vehicle manufacturer’s procedure.
Finally, fill the axle with the recommended type and quantity of oil.
The first test should confirm that the locker engages and disengages completely. Listen for the actuator and check the indicator switch. Inspect the wiring and housing for oil leaks.
If a driving test is required, use a loose surface and keep the speed low. When the locker is engaged, both rear wheels must rotate at the same speed. During a tight turn, the inside tyre may scrub or push because it can no longer rotate more slowly than the outside tyre.
Do not carry out this test on dry pavement.
After the first road and off-road test, inspect the axle again. Check for oil leaks, loose wiring, abnormal temperature and unusual gear noise.Using the Locker Correctly
A selectable locker is designed to be used when additional traction is needed—not left engaged during normal road driving.
Whenever possible, engage it before entering the obstacle. The vehicle should be stationary or moving very slowly, with little difference between the wheel speeds.
Trying to engage the locker while one wheel is already spinning rapidly can shock the locking mechanism and other driveline components.
Once the vehicle has crossed the difficult section, disengage the locker. Driving on a firm, high-traction surface with the differential locked can increase the turning radius and place unnecessary stress on the tyres, axle shafts, CV joints and gears.
A locker gives the driver more control, but it does not replace careful driving.